Painting Pixels
I have been on a "Roguelike" binge lately. I've played Caves of Qud, Cogmind, Quasimorph and some Cataclysm: Dark Days Ahead. I haven't really progressed into them that much apart from Qud, but my experiences have been fun.
So, naturally, I wanted to develop one myself. I named this project "Ichi", which literally means "one" (as in number) in Japanese, since this will be the first one I'm building. I'm keeping the scope limited and trying to get something playable relatively quickly so that I can move onto more complex one later.
That means next project will be named "Ni", the one after that "San" etc.
All of the art will be done by my lovely wife Seda! (˶ᵔ ᵕ ᵔ˶) I'm just telling her what I need and she magically turns that into an art. I consider myself lucky.

Oh also, I'm doing this from scratch in C++, of course.
"From Scratch"
Let's define "from scratch" here. What I mean by that is no engine or any framework, BUT with additional helpers. I don't want to get bogged down with platform differences or parsing .png headers, but I DO want to get bogged down blitting pixels to the screen, rendering sprites into a buffer, iterating over and processing entities etc. Fortunately people smarter than me already solved some of the common problems so that I can do just that.
So, here's the libraries that I'm going to be using;
- RGFW: This is a single-header windowing library. It generally fills the same role as more famous GLFW, but this one has "native" window surface as an option! That means we can blit our rendered buffer straight into the window surface, without any graphics API.
- stb_image: This single-header library is for reading image files. I could've used .bmp or maybe non-RLE .tga files and written my own reader (which I have done in the past) I just didn't want to bother here. I'll be mostly using .png files.
- glm: A math library that targets semantic parity with GLSL.
- While not really I library, I'm using some code I've written in an earlier template project, Scaffold. Namely profiler and input modules, which I've adapted to this project.
I also thought about starting with my Scaffold template, but wanted a different approach this time.
Project Setup
Since I'm planning to build on MacOS too, I set the project up with cmake instead of a .sln project. I set the clang-cl as the compiler on Windows, wrote some cmake scripts, took some "inspiration" from RGFW's native window example and voilâ, we got a native window that we can put pixels into!
Surface
Lets start by talking about the surface a little bit. A "surface" is a RGFW abstracted structure that has a width, a height and a buffer. It also has a format. We can resize and recreate it independently from the window. It can even be larger or smaller than the window itself, but being smaller can cause the program to crash.
Also for hiDPI, we might need more surface area than the window itself. RGFW reports hiDPI status in its RGFW_monitor struct, so we can query that to adjust our surface size.
We can also resize the surface at each window resize to make it match the window. That's an infrequent operation that won't affect performance. That way we don't need a static surface that spans the whole resolution. We can just allocate a buffer that's only needed for visible pixels.
static RGFW_surface* GetSurface(RGFW_monitor* monitor, int width, int height)
{
    static std::vector<uint32_t> buffer{};
    static RGFW_surface* surface = nullptr;

    int surfaceWidth = monitor->pixelRatio * width; //pixelRatio is 2.0 if we're in hiDPI
    int surfaceHeight = monitor->pixelRatio * height;

    if (surface != nullptr)
    {
        if (surfaceWidth == surface->w && surfaceHeight == surface->h) return surface;
        RGFW_surface_free(surface);
    }

    std::printf("surface resized, w: %d, h: %d\n", surfaceWidth, surfaceHeight);

    buffer.resize(surfaceWidth * surfaceHeight);
    u8* bufferPtr = reinterpret_cast<u8*>(buffer.data());
    surface = RGFW_createSurface(bufferPtr, surfaceWidth, surfaceHeight, RGFW_formatRGBA8);

    return surface;
}
This function resizes our surface if its needed. We call this every frame to get the updated surface. That'll be the buffer our game outputs into. We won't be rendering directly into this buffer though, we'll render into our own buffer first and blit at the end of the frame.
We need to nearest-neighbour resize if buffer size < screen size at blit. That's a TODO for now.
A Simple Sprite Renderer
With surface out of the way, we can start thinking about the renderer. The renderer will be decoupled from the game, meaning that our update loop won't concern itself how the game is drawn. We'll iterate through the entities over in a separate pass and render them one by one.
We'll first render tiles, then objects (a dropped sword, a thrown grenade etc.), then characters (player & NPC's). We'll manually sort everything and infer the scene rendering from the game state.
So far, so good, but how do we actually go about this?
- Our building block is the pixel, which is defined here. Not much to talk about it, it's just there as a convenience. We'll be using RGBA pixels.
- Images are pixel arrays with height and width values. Top left is the (0, 0) coordinate. We'll treat these as immutable, we load them once at startup and keep it loaded throughout the lifetime of the program.
- Sprites are views into images. They only have a start coordinate, width and height and pointer to an image. They can be mutated, copied, moved etc.
Currently, sprites are hardcoded in the Resources class. We can develop a whole separate resource packing & id system just for this, but I'm keeping Ichi's scope intentionally limited to get something playable relatively quickly.
Using these building blocks, we can render sprites into our internal buffer. Our images can also hold multiple sprites, just like an atlas. We can even animate sprites; just advance start coordinate of the sprite;
void AnimatePlayer(Sprite& playerSprite)
{
    static float passedTime = 0;
    static const float frameTime = 0.3;

    passedTime += Time::Get().deltaTime;

    if (passedTime < frameTime) return;

    passedTime -= frameTime;

    playerSprite.startX += playerSprite.width;
    playerSprite.startX %= playerSprite.image->size.x;
};
Our renderer just needs to take the sprite, loop it's pixels and write it into the buffer. We also center the sprite to the given point, this will simplify our draw logic outside the renderer.
We can always introduce "pivot" or "offset" into sprites later.
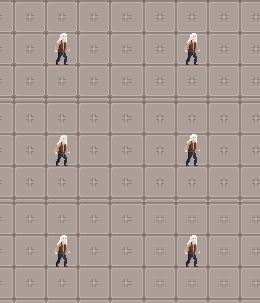
Here's the renderer implementation. Quite simple!
From Game To Screen
We have our (animated) player and our test tiles ready. In our game initialization, we populate the tiles. We can also move the player with keyboard. It's time to actually call the renderer & see the result on the screen.
But for that, we need to do some transformations. Fortunately we are on 2D, that makes the whole situation pretty simple.
We wanted to rendering to be decoupled from the game. That means our game positions should not be tied to screen positions. Thus, to reason about sprite placement on screen, we need a camera. Camera position will basically tell us where the center point of the screen is currently looking at in the game world, so that we can draw sprites on the screen relative to that position.
static glm::ivec2 GameToScreenCoords(glm::vec2 halfScreen, glm::vec2 gamePos, glm::vec2 camera)
{
    glm::vec2 pos = gamePos - camera; // reposition relative to camera
    pos.y = -pos.y; // game y is up, screen y is down, so we flip
    pos += halfScreen; // screen origin is top left, we push the center point to top left
    return pos;
}
The rest is just iterating over tiles & entities and calling the drawing functions. Here's the logic.
Conclusion & Future
I think we have a solid foundation for putting sprites into screen for now. I'll be focusing on some other stuff after this but this setup can be improved much, much further. Here's the repo at the time of writing this post.
- Rendering can be command buffer driven, that would make it easier to multi-thread it later.
- We need some kind of 9-slice sprite support for easier UI drawing. It can work without it but it would be a nice to have.
- Line, disk, circle, ellipses drawing might be useful for UI.
- We can draw mono spaced fonts as regular sprites, but a dedicated fast-path character rendering might prove useful in a multi-threaded context where characters are proven to be non-overlapping.